31 July 2012

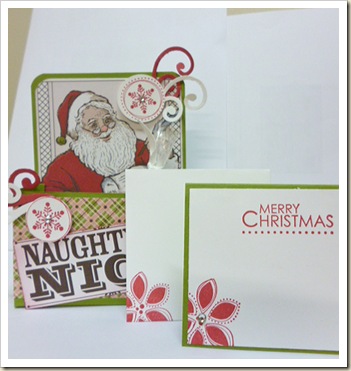
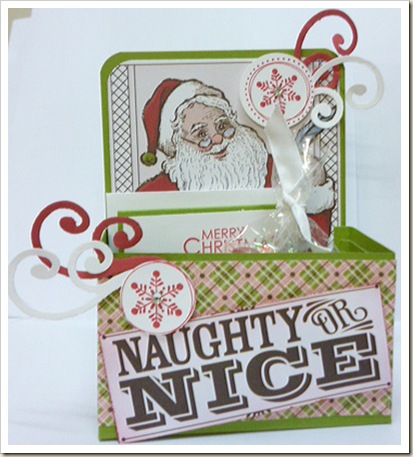
Santa Gift Box

Hi everyone,


Well we are more than half way through the year and over at Holly Jolly we are inspiring you to get creative this week and create a Christmas Gift Box.


Judy is hosting this weeks challenge which is to create a box.  What type of box, could be a gift box for treats, cards, soaps, candles let your creative mind and hands lead you.


Me? I found a great little tutorial on Splitcoast called Maria’s Treat Box – you can see it here.


This is such a quick and neat little box for a gift and perfect for occasions like Christmas.  So I have used Maria’s tutorial and came up with my Santa Gift Box.


I have used some of the paper from the Letters to Santa DSP and the Season of Joy stamp set which I haven’t used for ages.  There are some extra swirls which I created using the Swirls Scribbles Die and some bling.


I have used Old Olive for the base of the box and the treat inside the box are  some M & M’s and a little Christmas card and envelope.


Plus I finally used my Simply Scored Scoring Tool and it was so easy to use – bonus!


Here is my little creation:


P1000618_edited


Supplies:

Stamp set: Season of Joy

Card: Old Olive, Whisper White, Riding Hood Red 
Ink: Riding Hood Red

Accessories:  Simply Scored Scoring Tool, Sticky Strip, 3/8” (1 cm) Whisper White Taffeta Ribbon, Letters to Santa DSP, Swirls Scribbles Sizzlits Die,  4” x 6” Cellophane Bag, Whisper White Square Mini Envelopes,   
1” (2.5 cm) Circle & 1-1/4” (3.2 cm) Circle Punches,  Corner Punch, Dauber, Rhinestones, Dimensionals, SNAIL Adhesive


Below is photo of the box without the treat bag and the card:


P1000620_edited


and the last photo displays the box, the envelope and the little card I made to go with the gift.


P1000623_edite


This was a fun little tutorial you should give it a go!


I would like to enter this project into the following challenges:


Addicted to Stamps Challenge - #35 Christmas in July

2 Sisters Challenge - #102 Christmas in July Week 4

Sweet Stampin Challenge – Christmas in July

Jingle Belles Rock Challenge – Santa Baby

The Stamp Man Challenges – Anything Goes Celebrations

Inky Impressions Challenges – Use Dies/Punches

Belli Challenges - #148 Christmas in July

Pixie Dust Studio Challenge – Christmas


Want to join us this week at Holly Jolly click here to come and visit and see what the other Design Team members have created….. Meg
29 July 2012

Anything but a Card

Hi everyone,


Feeling rested from the weekend?  Me, yep and ready for a new week…..

Now it is time for  new challenge at Come and Get It this week and it is Anything but a Card.


So what would you create this challenge?


I have gone for some gift ideas: a couple of box ideas for treats.  Could be for a friend or may for Father’s Day that is coming up!


Here is a group shot of what I created and I have taken individual photos a little further in the post.


P1000606_edited-1


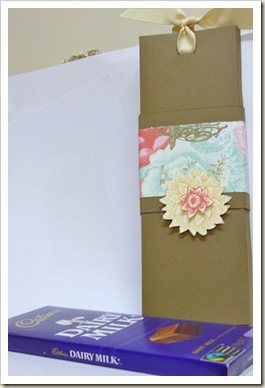
The Chocolate Slider gift is a great surprise and so easy to make. There are many tutorials on the internet if you have not given this a go.


P1000614_edited-1


I have added a chocolate block to the inside of the box and when you pull the ribbon up the block of chocolate slides out. 


I have used Soft Suede card stock some Attic Boutique DSP and the flower from the Creative Elements stamp set. The flower has been stamped in So Saffron and Calypso Coral and cut and layered together with Dimensionals. The ribbon is a retired Very Vanilla Grosgrain Ribbon.


P1000607_edited-1

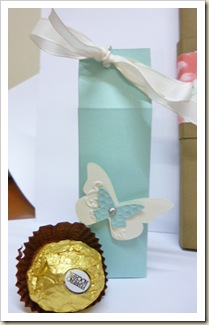
The other two little boxes have been created out a of a piece of card which is 6” x 6” and is from a tutorial I found on Craft Project Central.

The first little box has been created with Pool Party cardstock and some butterflies from the Beautiful Wings die cut.  The ribbon is a retired Very Vanilla Taffeta Ribbon.


I added some Ferrero Rocher’s to this box.


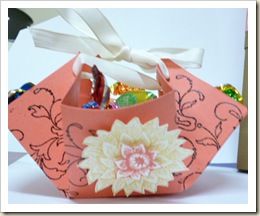
The last little creation was so quick to do.  I used Calypso Coral cardstock and embossed with black embossing powder the swirl from the Creative Elements stamp set.


P1000612_edited-1


Added the holes for the ribbon and weaved the ribbon (Very Vanilla) through and pulled it tight.


I added some mixed chocolates and lollies to little gift box but you could add almost anything.  I have added two flowers to two sides of the box so that they matched the Chocolate Slider.


Three little gift boxes and no cards in sight!  We would love you to show us what you would create so please stop by and see what the other Design Team members have created and join in!


I would like to submit these project into the following challenges:


Drunken Stampers Challenge - #94 Happy Milk Chocolate and Hamper Day

Inspire Me Friday Challenge – # 69 Anything Goes Challenge

Do You Stack Up Challenges - #82 For Friend

Crafts and Me Challenges - #94 Anything Goes

Anything Goes Challenges – # 72 Lets Not Be Square

Crafty Bloggers Network Challenges – # 1 Anything Goes


Thanks for visiting have a great week… Meg

26 July 2012

A Little Red

Hi everyone,


It’s Wednesday so we are all half way through the week and on the down hill slide to the weekend – Fabulous!


Now the card that I want to share with you has been inspired by the sketch I found at Seems A Little Sketchy. 


My first thoughts were to use some lace as well with the sketch but when I started to create the card things just took another path.


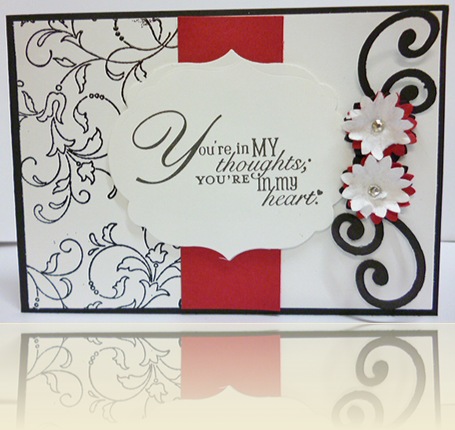
I love a Black, White and Red combo so I have used Basic Black card stock for the base of my card with some Real Red and Whisper White.


I have been having so much fun heat embossing that dusted off the heat gun and found the embossing powder once more and embossed the swirl pattern from the Creative Element stamp set on one part of the Whisper White cardstock.


My sentiment is from the Word Play stamp set and has been stamped on Whisper White cardstock and cut out using one of the Labels Framelits.


So I may not have used Lace but I still added some swirls which were created using the Swirls Scribbles Die. 


Once more I have made my own layered flowers by crushing and folding some punch flowers using the Boho Blossoms punch.


Oh yeah cannot forget some bling!


Here is my card:


P1000602_edited-1


Supplies:

Stamp set: Creative Elements, Word Play

Card: Basic Black, Real Red, Whisper White
Ink: Versamark, VersaFine Black

Accessories:  Boho Blossom Punch, Labels Collections Framelits, Swirls Scribbles Die, Basic Rhinestones, Dimensionals, SNAIL Adhesive


and the sketch is below, I have changed it a little :


I love how the embossing turned out – I think I am going to have to get that heat tool out a bit more :)


I would like to submit this card into the following challenges


Seems A Little Sketchy Challenge - #18 Sketch

Craft Your Passion Challenge - #120 Black, White Plus One

Waste Not Wednesday – Use something Old from your Stash

Creative Card Crew Challenges – Use Black cardstock

Paper Take Weekly Challenge – Make Your Own

Crafts and Me Challenges - #94 Anything Goes

Fashionista Challenges – # 7 Baby or Birthday


Enjoy the rest of your week ….. Meg

24 July 2012

Non-Traditional Christmas

Hi everyone – how has your week started?  Things are busy, busy, busy here in Sydney and it has been cold and rainy today :(


But then again it is Winter and speaking of Winter makes you think of Christmas right?!


Well it should because we have another Christmas card challenge at Holly Jolly and it is hosted by Julie and she has chosen a “Non-Traditional Christmas” challenge.


For my non-traditional colours I have been inspired by the latest challenge at Winter Wonderland Challenge and the colours are to use Pink and/or Purple PLUS Aqua and/or Green.


I have used Perfect Plum, Tempting Turquoise and Pretty in Pink.


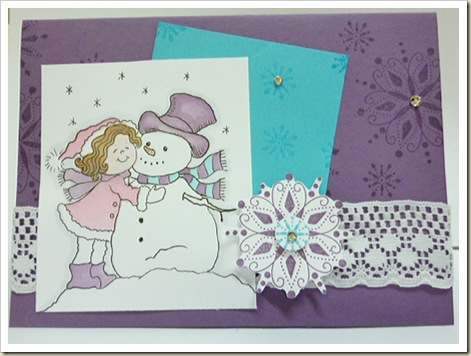
I stamped some snowflakes from the Snow Swirled stamp set on the base card and the piece of Tempting Turquoise cardstock.


I used some scrap paper and stamped some snowflakes one in Perfect Plum and one in Tempting Turquoise.  Cut them both out and layered them together with dimensionals.


I coloured the sponsor’s image called Emma the Hugger Snowman in with the Aqua Brush and with Pretty in Pink, Perfect Plum and Tempting Turquoise ink pads.  I also used a touch of Blushing Bride for the face, Soft Suede for her hair and the Snowman’s nose.


I added some lace from my stash and there is always room for ‘bling’!


Here is my card…


P1000598_edited


Supplies:

Stamp set: Snow Swirled, Fred She Said Image.

Card: Perfect Plum, Tempting Turquoise, Copic Cardstock 
Ink: Pretty in Pink, Perfect Plum, Tempting Turquoise, Soft Suede, Blushing Bride

Accessories:  Lace (Non-SU), Basic Rhinestones, Dimensionals, SNAIL Adhesive


It is making me chilly just looking this card but it is still cute! 


I would like to submit this card into the following challenges:


Winter Wonderland Challenge – Pink Purple Aqua Green

Go Fish Challenges - #21 Christmas in July

2 Sisters Challenge – # 101 Week 3 Christmas in July

Quirky Crafts Challenge - #15 Christmas in July

Speedy Friends and Fox Challenge - #117 Christmas in July 

Paper Play Challenges – # 29 Christmas in July

Card Mad Fairy's Digi Days Challenge - #38 Christmas in July

Sweet n Sassy Digis Challenge - #63 Christmas in July

Simply Create Too Challenge - #18 Use It Two Times at Least


One of the best things about our weekly challenge at Holly Jolly is that my Christmas card pile is growing so this year my Christmas cards should definitely go out on time!


Want to get ahead on your Christmas cards? Come over and join in the challenge and see what the other Design Team members have created!


See you next time…. Meg

22 July 2012

Sweet Dreams


Hi everyone,


How has your weekend been?  It has been a little busy here but we did have lovely “Christmas in July” themed dinner on Saturday night. 


A nice hot dinner at this time of the year seems fine to me although it has not been too cold and we had a little sun, so a bonus!


We have a BINGO challenge at Come and Get It this week and the challenge is also sponsored by Bugaboo, so prizes as well!


I have had a great time creating this challenge and my Bingo choices are Gem/Free Choice/Lace.


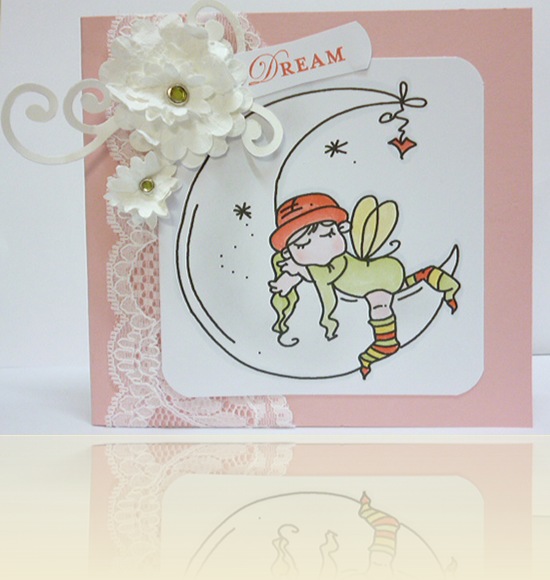
I do not normally use Lace on my cards but I love the added texture it gave to my card and my Free Choice is some Punched Flowers and Die Cut Swirls.


I have had a great time working with colouring the image, which again is something that I want to practice more.


The colour inspiration at Play Date Cafe has inspired the colours that I have used:


Blushing Bride, So Saffron, Certainly Celery and Calypso Coral with some Whisper White for the neutral card stock.


Here is my card:


P1000591_edited-1


Supplies:

Stamp set: Loving Thoughts, Bugaboo Brat Jesse Moon

Card: Blushing Bride, Whisper White, Copic Paper 
Ink: Blushing Bride, So Saffron, Calypso Coral, Certainly Celery, Going Gray (retired)

Accessories:  1-3/4” (4.4 cm) Scallop Circle Extra Punch, Lace (non SU), Circle Ice Rhinestone Brads (Green), Boho Blossoms Punch, Aqua Pen, Modern Label Punch, Swirls Scribbles Die, Corner Punch, Dimensionals, SNAIL Adhesive


In case you are wondering the sentiment is from the Loving Thoughts stamp set.


Don’t you think she looks very peaceful!  Need a little more inspiration please pop over the our Blog and see what other wonderful creations my fellow Design Team Members have created.


I would also like to submit this card into the following challenges:


The Play Date Cafe Challenge – # PDCC141 Colour Inspiration

Southern Girls Challenge – # 49 Angels & Fantasy

Stampin for the Weekend – # 14 Photo Inspiration (inspired by softness and colours)

Crafty Mess Challenge – 3 13 Sun or Moon

Alphabet Challenge – L is for Lace

Karens Doodles Netherlands Challenge – # 124 Infants/Toddlers

Cards and Scrap Challenges - #25 Wings

Bloggers Challenge – Die Cuts


Have a wonderful week everyone…. Meg

17 July 2012

Surfing Santa

Hi everyone,


It’s Tuesday and it is time for a new challenge at Holly Jolly Christmas Challenges.


This week’s challenge is being hosted by Cindy and it is Heat Embossing.


How long has it been since you did some heat embossing, well now you can get out that heat gun and join in the fun!


Now on to my card, well my first idea did not work :(


Although my second attempted proved better :)


I used the Surfing Santa image from the Happy Christmas, Mate stamp set which was stamped on Whisper White card stock with VersaMark ink and embossed with black embossing powder.


Real Red ink has been added to Santa’s hat and swimmers and a little blue colour to the waves.  The blue colour is Pacific Point.


I wanted to add a little bit more to my card, so I experimented with embossing on the Silver Glimmer Paper and it worked.


I stamped snow flakes from the Snow Swirled stamp set with VersaMark ink and then added some black embossing powder.  I cut the larger snowflake out and the smaller snowflake was punched out using the larger circle from the Builder Owl punch.


Not that you would see any snowflakes when Santa is surfing here at Christmas - I like the added touch of glitz.


The DSP that I have used is from the Letters to Santa pack and the base of my card is Marina Mist.  The Christmas sentiment “Happy Christmas, Mate!” has been stamped in Basic Black ink.


The layout of my card has been inspired by the current sketch at Sketch Saturday.


Here is my surfing Santa Christmas card:


P1000590_edited-1


Supplies:

Stamp set: Happy Christmas,Mate, Snow Swirled

Card: Marina Mist, Whisper White
Ink: Real Red, Pacific Point, Basic Black, VersaMark

Accessories:  Owl Builder punch, Black Emboss Powder, Letters to Santa DSP,Silver Glimmer Paper , Dimensionals, SNAIL Adhesive


Doesn’t he look very cool with his dark shades on – LOL.


For some more inspiration come over and see what the other Design Team members have created at Holly Jolly Christmas Challenge.


I would like to submit this card into the following challenges:


Sketch Saturday Challenges: # 216 Sketch

Amusing Challenges:– Christmas in July

The Pink Elephant Challenges: #156 Christmas in July
Hooked on Crafts Challenges: #22 Christmas in July
Little Red Wagon Challenges: #141 Christmas in July
2 Sisters Challenge: #100 Christmas in July (I didn't go for the option!)
Totally Gorjuss Challenge: #140 It's Christmas 
Drunken Stampers - #93 A Merry Christmas in July with a Summer/Sun/Tropical Twist

Crafty Calendar Monthly Challenge – Fun in Sun


Have a wonderful week, keep safe and don’t forget to keep creating !!   See you next time… Meg

15 July 2012

CAGI Sketch

Wow, where did the weekend go??


I cannot believe that my weekend has come to an end.  Although when you spend half your Saturday morning taking a little person to dancing and then today I have been at the Western Sydney Community Indoor Market - yes I can understand why it went so fast.


It has been a beautiful winter’s day here in Sydney and I have met some wonderful people at the markets today plus I was able to continue working on some new box/card ideas.  So what more can you ask for!


It’s Sunday and that means it is time for a new challenge at Come and Get It.  This week it is a sketch challenge which has been created by Cindy.


The sketch can be seen below and you can see what the other Design Team members have created by clicking on the picture to take you to the challenge.


Cindy Sketch


I love this sketch that Cindy has created - to me it is a great sketch to create a quick card and use some scrap pieces of paper.


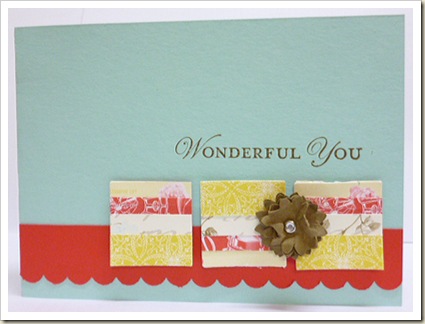
For my card I have used scraps of the Attic Boutique Designer Series Paper, layered them together and punched out 3 squares using the 1-1/4” (3.2 cm) square punch.


The base of my card is Pool Party and I added a strip of Poppy Parade.  The Poppy Parade has a scallop edge on one side which has been created using the Scallop Trim Border Punch.


I punched out 3 of the large flowers from the Boho Blossoms. The flowers were squashed and crumbled them until they separated and are held together with a clear rhinestone brad.


The scrap paper squares and Soft Suede flower have been added to the card using dimensionals.


The sentiment “Wonderful You” is from the Loving Thoughts stamp set which is in the Autumn-Winter Mini Catalogue.


Here is my card for the challenge:


P1000580_edited-1


Supplies:

Stamp set: Loving Thoughts

Card: Pool Party, Poppy Parade, Soft Suede

Ink: Soft Suede

Accessories:  1-1/4” (3.2 cm) Square Punch, Clear Rhinestone Brad, Boho Blossom Punch, Attic Boutique DSP, Scallop Edge Border Punch, Dimensionals, SNAIL Adhesive


This was a very quick card to make and it was great to be able to use the scraps of paper too!


I would also like to submit this card into the following challenges:


Cas-ual Fridays Challenge - #61 Use strips of colour or pattern in your creation

Moving Along with the Times – Make It Sentimental

My Heat Pieces Digital Stamp Challenge – Make Something for Someone Special


Have a wonderful week everyone and thanks for stopping by… Meg

10 July 2012

Holly Jolly Angel

Hi everyone, I hope that your week is going well and that you and your family are well :)


It is Tuesday and it is time for a new Holly Jolly Christmas Challenge.  This week the challenge is hosted by Judy with an Angels Theme.  We would love you to join us and you can see what the other Design Team members have created by clicking on the link above.


I had planned to do some punch art for my Angel project but it just wouldn’t work.  So I had a look around my stash and found a lovely Angel stamp set that I brought a number of years ago on EBay.  It is a Stampin Up stamp set called On Angel Wings and I decided to use this set instead.


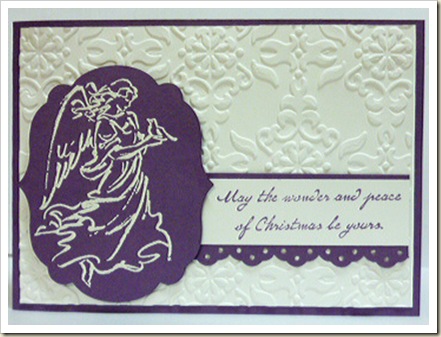
I have gone non-traditional colours again and I have used Perfect Plum and Whisper White card stock to create my card.


I stamped the Angel image with a Versamark ink pad on some Perfect Plum cardstock and embossed it using white embossing powder.


I then used the Labels Framelits to cut out the image and layered it on a piece of  Whisper White card which I embossed using the Vintage Wallpaper Textured Impressions Embossing Folder.


I used the Eyelet Border Punch to create an edge on a smaller piece of Perfect Plum cardstock.  I stamped the sentiment from the same stamp set on some Whisper White cardstock and added the two layers to my card. 


The sentiment reads “ May the Wonder and Peace of Christmas be Yours”. 


The layout of my card has been inspired by the current sketch at Christmas Card Challenges.  The sketch can be seen below:


and below is my card…


 P1000572_edited-1


Supplies:

Stamp set: On Angel Wings

Card: Perfect Plum, Whisper White
Ink: Versamark, Perfect Plum

Accessories:  Eyelet Border Punch, White Embossing Powder, Labels Framelits, Vintage Wallpaper Textured Impressions Embossing Folder, Dimensionals, SNAIL Adhesive


I had a great time creating this card and I realised that I have not used my heat gun to do some embossing for ages!  I had also put this stamp set aside but I think I need to use a little more :)


I would like to enter this card into the following challenges:


Christmas Card Challenges – #32 Sketch

Crafter’s Companion Challenges – # 26 Ho Ho Christmas

Through the Craft Room Door Challenges – Christmas in July

2 Sisters Challenge - #99 Christmas in July (bonus no red or green)

The Squirrel and the Fox Challenge - #21 Christmas in July

Our Craft Lounge Challenge - #124 Die Cut


Have a wonderful week and keep safe.  See you again soon… Meg 

08 July 2012

CAGI Colour Challenge

Hi everyone – I think that last week was gone before a blink of an eye, well for me it went so fast.


And here we are Sunday with a new challenge at Come and Get It and this week it is a colour challenge:


Daffodil Delight, Calypso Coral and Pool Party


Are you up for the challenge ?  I hope that you are - here is the link the post and you can see what the other Design Team members have created.


The idea for the layout of my card was inspired by the current sketch layout at Clean and Simple.  I have changed the layout a little and you can see the layout below:


Our CAGI challenge this week is sponsored by Fred She Said and I have created my card using the Pattern Frame & Flourish set which is designed to be used with the Top Note Die.


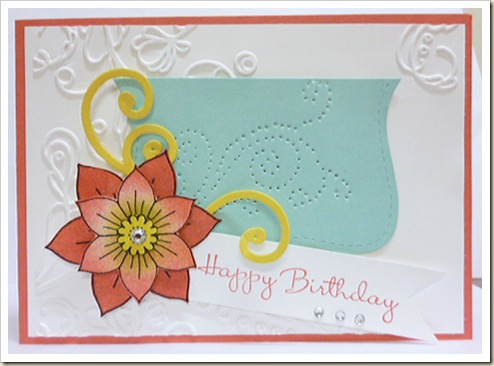
I have printed the images on Whisper White cardstock and cut out a Pool Party Top Note Die shape with the Big Shot.  I then cut it in half.


The patterned frame has flourish/swirl as part of it and I have taken the printed flourish/swirl and paper pieced it on half of the Top Note Die Shape.


I used embossed a piece of Whisper White card stock using the Elegant Lines Textured Embossing Folder and layered this on to the base cardstock Calypso Coral.


The flower which is part of the Pattern Frame and Flourish set was cut out, so that I had three larger petals and a smaller centre of the flower.


A lovely friend gave me so good advice last week about adding colour with a sponge.  So this week I sponged Calypso Coral on the bottom flower layer, Daffodil Delight in the centre of the middle flower layer and Calypso Coral on the edges.  The last layer the centre of the flower was sponged with Daffodil Delight.  The flower was put together using the Dimensionals with some ‘bling’ in the centre of the flower.


I used some scrap Daffodil Delight to create the swirls using the Swirls Scribbles Sizzlits Die.  I stamped the Happy Birthday from the Happiest Birthday Wishes stamp set on scrap Whisper White card stock in Calypso Coral ink and then added some more rhinestones.


Here is the final result…


P1000561_edited-3


Supplies:

Stamp set: Happiest Birthday Wishes, Fred She Said Pattern Frame & Flourish

Card: Calypso Coral, Daffodil Delight, Pool Party, Whisper White
Ink: Calypso Coral, Daffodil Delight

Accessories:  Swirls Scribbles Sizzlits Die, Top Note Die, Elegant Lines, Textured Impressions Embossing Folder, Basic Rhinestones, Dimensionals, SNAIL Adhesive


At first I was not sure if I was going to be able to make the colours work together but I am happy with the end result.  This is another reason I love participating in challenges as they continue to inspire me create things a little different.


I would like to submit this card into the following challenges:


Clean & Simple Challenge - #198 Sketch

Paper Play Challenge – # 27 Happy Birthday

Crafty Ann’s Challenge – # 69 Paper Piecing

Fun with Shapes and more Challenge - #113 Summer Birthday

Ruby's Rainbow Challenge – # 32 Emboss It

Clear It Out Challenge – Anything Goes plus add Yellow

Sweet Stampin Challenge – Paper Piecing


Have a great week…. Meg

05 July 2012

CAS Imagine Card

Hi everyone,


Hope that you week has been going well – just one day closer to the weekend and I am really looking forward to it!!


I have a quick card that I wanted to share with you that has been inspired by the following challenges:


image


Use Less is More’s Header for your inspiration


and


image


Dynamic Duo’s Colour challenge to use Crumb Cake and your own choice.


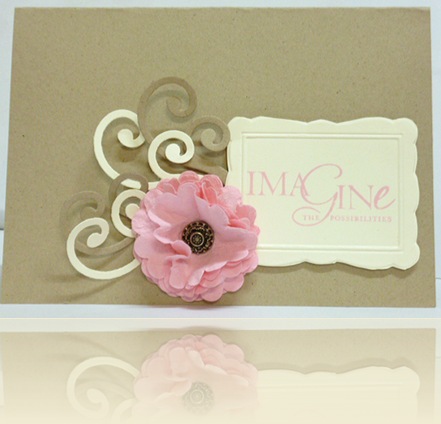
I have been wanting to use the Scallop Circle Punch to create some flowers so with these two challenges in mind, I gave it a go.


I used Crumb Cake card stock for the base of my card and the punched out 3 Scallop Circles in Pretty in Pink.  I crumbled, squashed and folded each Scallop Circle and separated the cardstock to give me 6 pieces.


I layered the Scallop Circles and held them together with an Antique Brad – I love these brads!


I used the Swirls Scribbles Sizzlits Die to create some swirls in Very Vanilla and Crumb Cake and I also created a frame for my sentiment using the Textured Impressions Embossing Folder Set – Designer Frames.


I stamped the sentiment “Imagine the Possibilities”  from the Word Play stamp set in the Frame using Pretty in Pink ink.


Everything was layered together and here is my card….


P1000558_edited-1


Supplies:

Stamp set: Word Play

Card: Crumb Cake, Pretty in Pink, Very Vanilla
Ink: Pretty in Pink

Accessories:  1-3/4” (4.4 cm) Scallop Circle Punch, Antique Brads, Designer Frames Embossing Folder, Swirls Scribbles Sizzlits Die, Dimensionals, SNAIL Adhesive


I love the colour combo and the simple clean look of the card.  I think I am going to try out this layout with some other colours!


I would like to enter this card into the following challenges


Less is More Challenges – # 74 Header Inspiration

Dynamic Duo Challenges - #9 Crumb Cake & Your choice

Crafty Card Markers Challenge - #71 Create Your Own Flowers

Crafty Calendar Challenge (monthly) – Flowers in Bloom


Have a great Friday, see you again soon…. Meg

03 July 2012

Acrostic Christmas Challenge

Hi everyone,


It’s my turn to host the new challenge at Holly Jolly this week and I know that you are going to want to participate plus we have a great prize too!


My challenge this week has been inspired by my daughter who has been creating Acrostic Poems.  So I thought it would be a great idea for one of our challenges.


To participate you need to use two different letters from the word CHRISTMAS to inspire your project.


There are some suggestions for each of the letters on our blog post and some great inspiration from other Christmas Elves which you can see here


For my project I have used the letters:


R – Red

S – Sparkle

M – for music which is my Christmas song ‘Let it Snow"’

T – for my TRIFOLD card


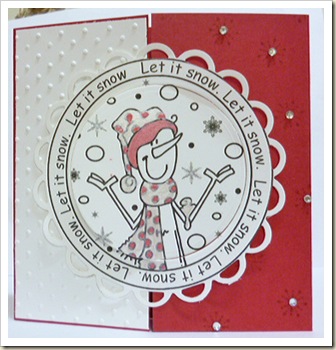
I have use Real Red card stock for the base of my card and created a Trifold card.


One side of the card is Whisper White cardstock which has been embossed using the Perfect Polka Dots Textured Embossing Folder.


The other side of the opening of the card has been stamped randomly with Snowflakes from the Snow Swirled stamps set and I have added Six Sparkling Rhinestones.


The image is our Sponsors Image, I have printed the image on Whisper White cardstock and added some Frost White Shimmer Paint to the Beanie and Scarf. 


I mixed up some Real Red ink and Frost White Shimmer Paint and painted the spots on the Scarf and trim on the Beanie.


The image has been cut twice with Nestabilities. One to get the scallop trim and the other to cut the separate the middle of the image.


I have then added the scallop layer to the left hand side of the card and the Snowman image to the right hand side of the card.


Here is my card…


P1000552_edited


Supplies:

Stamp set: Snow Swirled, Bugaboo – Let it Snow

Card: Real Red, Whisper White
Ink: Real Red

Accessories:  Nestabilities Die cuts, Frost White Shimmer Paint, Perfect Polka Dots Textured Impressions Embossing Folders, Basic Rhinestones,  SNAIL Adhesive


I have had a great time creating my Acrostic Christmas card – do you think you are up for the challenge?


I would like to also submit this card to the following challenges:


Phindy’s Place Challenge – # 112 Inspired by a Song

Lollipop Crafts – # 84 Christmas in July

Pan Pastel UK Challenge – # 25 Use a Digi

52 Christmas Card Throwdown – Anything Goes

Delightful Sketches – Celebrations

The Secret Crafter Saturday Challenge - #192 Christmas

Totally Paper Crafts Challenge – Can You Digi It?

Hiding in My Craft Room – # 52 Anything Goes


Have a great week everyone and take care…. Meg

01 July 2012

Butterfly Summer Sunset


Hi everyone, I hope that you have had a great weekend. 


Mine has been very busy. School has finished here for a few weeks, so we have been at dancing on to different occasions over the weekend and I think that today is just been a little too cold, windy and I would have liked a longer sleep in!


Maybe that is why I have created a warm summer sunset for the latest challenge at Come and Get It.  Our current challenge is Bugs. 


My fellow Design Team members have created some great inspiration, click here and come over and have a look, we would love it if you joined us!


What Bug did I choose ?  A Butterfly.


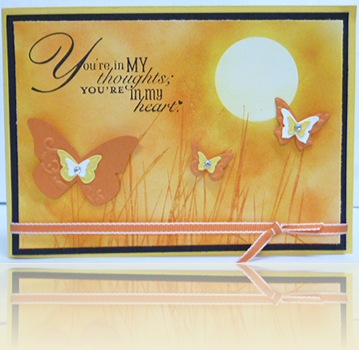
I have created a summer sunset scene for my butterflies, which I have not done for a while and I wanted to have a play with some colours.


I used a piece of Whisper White cardstock and punched out a Post-It circle with the 1 3/8” Circle Punch and added it to my cardstock before I started.


The colours I decided to use were More Mustard, Pumpkin Pie, Daffodil Delight and they have been added with a dauber. 


Once I was happy with the colours, I stamped the grass from the Inspired by Nature stamp set in More Mustard and then in Pumpkin Pie which had been stamped off first.


The butterflies were created using the Beautiful Wings Embosslits Die and have been layered together in a combination of Pumpkin Pie, Daffodil Delight and Whisper White.  I have also added some ‘bling’ to the centre of the last layer of each butterfly.


The Pumpkin Pie 1/8” (3.2 mm) Taffeta Ribbon was a last minute thought.  The sentiment is from the Word Play stamp set.


Here is my card…


P1000548_edited


Supplies:

Stamp set: Inspired by Nature, Word Play

Card: More Mustard, Pumpkin Pie, Daffodil Delight, Basic Black, Whisper White
Ink: More Mustard, Pumpkin Pie, Stazon Black, Daffodil Delight

Accessories:  1-3/8” (3.5 cm) Circle Punch, Pumpkin Pie 1/8” (3.2 mm) Taffeta Ribbon, Beautiful Wings Embosslits Die, Daubers, Basic Rhinestones, Dimensionals, SNAIL Adhesive


I am feeling nice and warm just looking at this card :)


I would like to enter this card into the following challenges:


Chocolate Coffee Cards Challenge – # 16 Anything Goes

Emergency Crafts Challenge – Summer Sun

Raise the Bar Challenge - #107 Summer

The Stamp Man Challenge – Bling It On

Deep Ocean Challenge – # 28 Welcome Summer

Craft Your Passion Challenge – # 116 Things with Wings

Fashionista Challenge – # 4 Winged Things

My Craft Spot Challenge – # 61 Hot Summer Colours

Little Red Wagon Challenge - #139 Sentimental You


Thanks so much for visiting and I hope to see you back again soon.  Have a great week….. Meg